Anaconda - a suite of data science tools
A platform for doing data science; for our purposes, it gives us Python, R and RStudio, and Jupyter Notebooks.
Introduction
Cost = $0.
Anaconda is a platform for data science work. By installing Anaconda, you get access to a series of tools for working in both the Python and R programming languages, plus excellent visual interfaces that reduce (some of) the pain of programming.
When we do work in python, we sometimes need to add more lego-pieces to what we’re doing, to accomplish specific tasks. Anaconda comes with very nearly - but not all - of the pieces you might need. The thing is, different tasks might require the same pieces, and if you’ve ever fought with a sibling over who gets the good lego piece, well, that’s what can happen inside your machine. Anaconda keeps everything playing nice by allowing us to create environments with copies of the pieces we need, separate from other copies, so that there are no conflicts.
Anaconda also gives us some excellent user interfaces for doing our work - juypter notebooks and R Studio - for instance. In this course, we’ll use R Studio a bit, and we’ll take a look at some jupyter notebooks, but we’ll mostly use python at the command line.
Download
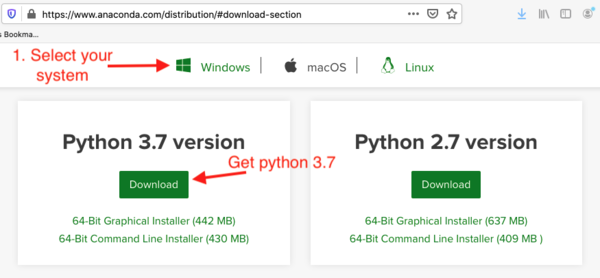
Python is up to version 3.8; feel free to grab that. Double-click the downloaded file to install.
Accept all of the defaults during the installation. (More info on the installation process is here).
Anaconda comes with something called ‘Anaconda Navigator’, which looks like this:

Click on the ‘install’ buttons for jupyter notebook and R Studio.
…and you’re done.
Reminder
Powershell and Terminal
We may occasionally launch some of these apps (eg, Jupyter Notebooks, R Studio). For now, we’ll be using the command line. Windows users in particular: we’ll be using the ‘powershell’. You can click on the ‘Powershell Prompt’ in Anaconda Navigator. You can also find it by searching your pc for ‘Anaconda Powershell’.
When I ask you to use the command prompt, Windows users: I mean anaconda powershell.
Mac users can use the terminal (which you can find under applications -> other -> terminal).
Going forward, when I want you to enter code at the command prompt or terminal prompt, I will signal this by starting the line with a $, like this:
$ echo "this is what it looks like"
You do not type the $.
Open a command prompt or terminal now and confirm that anaconda is installed:
$ conda --version
and that python is installed:
$ python --version
if you get an error message, then anaconda did not install correctly or Windows users you might not be in anaconda powershell.
When we type ‘conda’ or ‘python’ or indeed ‘echo’ or anything else at the prompt, we are telling the computer that this is a command. If we want the machine to run a particular python program we’ve written, we would invoke python followed by the program name, eg example.py so that the machine knows to open example.py with python.
Navigating the Commandline
When you click on a file in your windows explorer or in mac’s finder, you click through nested folders, right? The path you take through those folders will look something like this: username\example-folder\a-subfolder\file.txt, although finder or explorer by default don’t show you that.
When you open anaconda powershell or the terminal, how do you know where you are at? You print the working directory:
$ pwd
and that will give you the path to where you are working. To see what’s inside the folder, you can:
$ ls list files, on a Mac or
$ dir directory, on a PC
Files will have an extension (eg, .txt, .doc) while directories won’t. To go into a directory, we change directories:
$ cd subfolder
and we can go back up a level:
$ cd ..
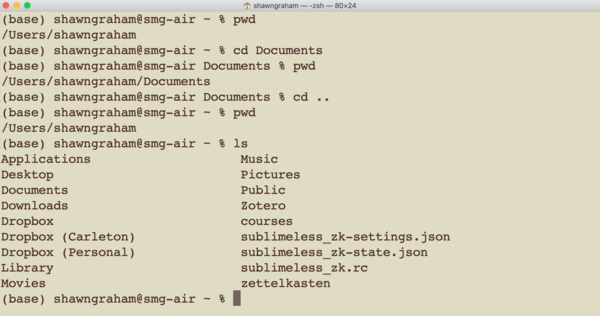
My terminal, demonstrating a bit of moving around. Also some of the contents of my machine.