Wget
A versatile tool for downloading web resources and files.
The following combines elements of Ian Milligan’s tutorial at The Programming Historian, as well as Kellen Kurschinski’s.
Introduction
Wget is a program for downloading materials from the web. It is extremely powerful: if we do it wrong we can look like an attacker, or worse, download the entire internet! We use this program on the command line. We will cover some of the basics, and then we will create a little program that uses wget to download materials from Library and Archives Canada.
In what follows, push yourself until you get stuck. I’m not interested in how far you get, but rather in how you document what you are able to do, how you look for help, how you reach out to others - or how you help others over the bumps. I know also that you all have lots of other claims on your time. Reading through all of this and making notes on what you do/don’t understand is fine too.
Installation
Mac Users You will need a tool called ‘homebrew’ to obtain wget. Homebrew is a ‘package manager’, or a utility that retrieves software from a single, ‘official’ (as it were) source. To install home brew, copy the command below and enter it at your terminal:
$ /usr/bin/ruby -e "$(curl -fsSL https://raw.githubusercontent.com/Homebrew/install/master/install)"
Then, make sure everything is set up correctly with brew, enter: $ brew doctor
Assuming all has gone well, get wget: $ brew install wget
Then test that it installed: $ wget If it has installed, you’ll get the message -> missing URL.. If it hasn’t you’ll see -> command not found.
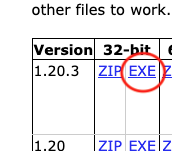
Windows Go to this website and right-click, ‘save target as’ the file for the 32-bit version 1.20.3 EXE file.
Move this file out of your Downloads folder into your c:\Windows\System32 directory. That way, when you type wget at the command prompt, Windows will find it.
Basic Usage
Wget expects you to enter the URL to a webpage or some other online file. How do websites organize things? Milligan writes:
Let’s take an example dataset. Say you wanted to download all of the papers hosted on the website ActiveHistory.ca. They are all located at: http://activehistory.ca/papers/; in the sense that they are all contained within the /papers/ directory: for example, the 9th paper published on the website is http://activehistory.ca/papers/historypaper-9/. Think of this structure in the same way as directories on your own computer: if you have a folder labeled /History/, it likely contains several files within it. The same structure holds true for websites, and we are using this logic to tell our computer what files we want to download.
So let’s try to do that. At the command prompt or terminal, let’s make a new directory to do our work in:
$ mkdir wget-activehistory
$ cd wget-activehistory
and let’s grab the index page from the papers directory:
$ wget http://activehistory.ca/papers/
ta da! Look around in that directory, see what got downloaded.
! Trouble ! Windows users, if you get a ‘command not found error’, it’s because Windows doesn’t recognize where you’ve put the
wget.exeprogram. There are a variety of ways of solving this, but perhaps - for now - the easiest way to fix this is to move thewget.exefile into the folder you are working with, and then remembering to add.exeto anywgetcommand.
But that was only one file. We’re going to add some more flags to the command to tell wget to recursively follow links (using the -r flag) in that folder but to only follow the links that lead to destinations within the folder (using the -np meaning ‘no parent’). Otherwise we could end up grabbing materials five steps away from this site! (If we did want materials outside of where we started, we’d use the -l flag, ‘links’). Finally, we don’t want to be attacking the site demanding gimme gimme gimme materials. We use the -w flag to wait between requests, and to --limit-rate=20k to narrow the bandwidth our request requires.
-rrecursive-npno-parent-llinks beyond domain we started in-wwait time between requests to the server--limit-rate=limit the bandwidth for our request (which necessarily slows down how long it’ll take to perform the request)
Altogether, our command now looks like this:
$ wget -r -np -w 2 --limit-rate=20k http://activehistory.ca/papers/
Give that a try!
Using wget with a list of urls
Let us assume that you were very interested in the history of health care in this country. Through the Library and Archives Canada search interface, you’ve found the Laura A. Gamble fonds, a nurse originally from Wakefield Quebec (just north of Ottawa).
You click through, and find the first image of her diary; if you right-click on that image and select view image you find that the file path to the image: http://data2.archives.ca/e/e001/e000000422.jpg.
Now, if Library and Archives Canada had an API for their collection (an ‘application programming interface’, or a set of commands that we could use on our end to deduce and correctly work with the information we want), we could just figure out the urls for each image of the diary in that fonds. But they don’t. Turns out, the urls we want run from …422 to …425 (but try entering other numbers at the end of that URL: you will retrieve who-knows-what!):
- In your text editor, create a new file and paste these urls into it; save the file as
urls.txt
http://data2.archives.ca/e/e001/e000000422.jpg
http://data2.archives.ca/e/e001/e000000423.jpg
http://data2.archives.ca/e/e001/e000000424.jpg
http://data2.archives.ca/e/e001/e000000425.jpg
Now, we know that we can pass an indivual url to wget and wget will retrieve it; we can also pass urls.txt to wget, and wget will grab every file in turn!
- Try this at the terminal/command prompt:
$ wget -i urls.txt -r --no-parent -nd -w 2 --limit-rate=100k
nb Because we are good digital citizens, it will take quite some time to download this material. Do not close your command prompt until it finishes.
(You can google for wget options too by the way).
Using python to generate a list of urls
Now, let’s try something a bit more complex. It’s one thing to manually copy and paste urls into a file, but what if we want a lot of files? You could just set wget to crawl directories, but that can make you look like an attacker, it can clutter your own machine with files you don’t want, and it can mess with your bandwidth and data caps. Sometimes though we can suss out the naming pattern for files, and so write a small program that will automatically write out all of the urls for us.
Consider the 14th Canadian General Hospital war diaries. The URLs of this diary go from http://data2.archives.ca/e/e061/e001518029.jpg to http://data2.archives.ca/e/e061/e001518109.jpg. That’s 80 pages.
- make a new directory for our work - at the command prompt or terminal,
$ mkdir war-diaries - Create a new file in your text editor. I’ll give you the script to paste in there, and then I’ll explain what it’s doing.
urls = '';
f=open('urls.txt','w')
for x in range(8029, 8110):
    urls = 'http://data2.collectionscanada.ca/e/e061/e00151%d.jpg\n' % (x)
    f.write(urls)
f.close
First, we’re creating an empty ‘bin’ or variable called ‘urls’. Then, we create a variable called f for file, and tell it to open a new text file also called ‘urls’. Then we set up a loop with the for command that will iterate over the 80 values from 8029 to 8110. The next line contains our pattern, the full url right up until e0151. The last little bit, the %d takes the number of the current iteration and pastes that in. The \n means ‘new line’ so that when we iterate through this again, we’ve moved the cursor down one line. This information is being kept in the first variable we created. Then with f.write(urls) we put all of the information in that first variable urls into the file we created in the second line, urls.txt. Once we’ve finished - we’ve gotten all the way to 8110 - the loop is done, we close the file, and the script stops.
Save this file as
urls.pyin your directorywar-diaries. The.pyreminds us that to run this file we’ll need to invoke it with python. (If you haven’t got Python installed in your machine, pause here and go follow the Anaconda tutorial).At the command prompt / terminal (windows: ananconda powershell remember!) make sure you are in your
war-diariesdirectory withpwdto see where you are, andcdas appropriate to get to where you need to be.Make sure the file is there: type
lsordiras appropriate and make sure you see the file. Let’s run this file:$ python urls.py. After a brief pause, you should just be presented with a new prompt, as if nothing has happened: but check your directory (lsordir) and you’ll see a new file:urls.txt. You can open this with Sublime Text to see what’s inside.Now that you’ve got the urls, use wget as you did for Laura Gamble’s diary (it’s the exact same command). It might go rather slowly, but keep an eye on your file explorer or finder. What have you got in your directory now?
Remember to put everything you’ve created into your repo on github.
Be a good digital citizen
Always use the wait and limit-rate flags so that you do not overwhelm the server (the computer at the address of your url) with your requests. You can get yourself into trouble if you don’t. Make sure you understand the ideas around recursively following links, link depth, and ‘no-parents.’ Read the original tutorials by Ian Milligan at The Programming Historian, and Kellen Kurschinski for more details.
Oh, one last thing - another option for easy scraping when you want just the content of the website, rather than the underlying files, is trafilatura.