TF-IDF with R
TF-IDF is a way of looking at word distributions to spot patterns.
If you have a collection of text files (diaries, articles, documents from an archive, etc) term frequency - inverse distribution frequencey is a way of identifying distinctive words in a document as compared to the overall distribution of words in your corpus of material.
If you are working in Python, Melanie Walsh’s tutorial or Matthew J. Lavins' lesson are both excellent.
Here, we’re going to use R.
Some Math
Term Frequency: the number of times a word appears in a document.
Inverse Document Frequency: log(total number of documents/ number of documents with the term)
Or, let’s quote Melanie Walsh, as this is the best explanation:
You take the number of times a term occurs in a document (term frequency). Then you take the number of documents in which the same term occurs at least once divided by the total number of documents (document frequency), and you flip that fraction on its head (inverse document frequency). Then you multiply the two numbers together (term_frequency * inverse_document_frequency).
The reason we take the inverse, or flipped fraction, of document frequency is to boost the rarer words that occur in relatively few documents. Think about the inverse document frequency for the word “said” vs the word “pigeon.” The term “said” appears in 13 (document frequency) of 14 (total documents) Lost in the City stories (14 / 13 –> a smaller inverse document frequency) while the term “pigeons” only occurs in 2 (document frequency) of the 14 stories (total documents) (14 / 2 –> a bigger inverse document frequency, a bigger tf-idf boost).
That is the one and only time any math appears in this course; and it’s not too hard to get our heads around. The problem now is getting the computer to do it.
In R, we’re going to use the tidyverse family of packages (collections of little building blocks of code and functions) to achieve this. In fact, we can do it in a single line of code. The hard part is getting our data into shape to do this in the first place!
Get some data
Right-click, save-as, this zip file with some text files. These are the original text files for the ‘syllabus’ part of this course website, by the way.
Create a folder on your machine. Call it ‘tf-idf-tutorial’. Create a subfolder within that and call it ‘data’. Uzip the folder you just downloaded, and move the six text files into that ‘data’ folder you just created.
Start up R Studio (I’m assuming you have R Studio installed on your machine.
Set Up Your Workspace
Create a new script (green plus button, top left). Over the next several paragraphs, I’m going to walk you through the pieces of code that you will run in order to get R to load up those text files, clean the text up, calculate tf-idf, and visualize the results. Remember, you run each line of code by placing your cursor on the line where the code is, and then ctrl/cmd + enter.
Set the working directory to ‘tf-idf-tutorial`. The full path to that directory goes between the quotes below (the code shows the location on my machine; your’s will be different):
setwd("/Users/shawngraham/tf-idf-tutorial")
Install and/or Load the Packages You’ll Need
Packages, in R, are little bits of code, routines, helper functions, designed to achieve particular aims. We install packages with the install.packages() command, and we tell R that we intend to use a particular package with the library() command. It might take a bit of time to load these packages up. These are quite standard packages, so you should be able to install these without issue.
install.packages('tm')
install.packages('tidyverse')
install.packages('tidytext')
install.packages('magrittr')
install.packages('ggplot2')

library(tm)
library(tidyverse)
library(tidytext)
library(magrittr)
library(ggplot2)
Load The Data; Clean It Up
We’re now going to use the Corpus command, which is part of the tm package, to read all of the text files from the data directory and place them in a variable called a (which is just a name; you could call it anything.)
a <- Corpus(DirSource("data/"),
            readerControl=list(language="lat")) #lat = latin characters
We’ll use other commands from the tm package to preprocess the text to make it easier to work with. Notice the last command is ‘turned off’ by putting a # in front of it. If you delete that # and run that line, tm will cut off the endings of words so that you just have the stems. There could be linguistic or analytic reasons why you might want to do that.
The following series of commands create a variable called a (the name doesn’t really matter) and then in a series of steps clean up the text by removing any digits, punctuation, and so on.
a <- tm_map(a, removeNumbers)
a <- tm_map(a, removePunctuation)
a <- tm_map(a , stripWhitespace)
a <- tm_map(a, tolower)
# a <- tm_map(a, stemDocument, language = "english")
Now we’re going to turn ‘a’ into a dataframe (a kind of table that R understands how to work with) and we’ll write the result to a single file, for posterity. We create a variable df, and then using the data.frame command, we tell R to get the content from a that we just cleaned, and put it into df. Then we instruct R to write a new file called “data.csv”, and its contents will be everything that is in df.
df <- data.frame(text = get("content", a))
write.csv(df, "data.csv")
Because of the way R understands different kinds of tables (which we don’t need to go into right now, but it’s to do which R’s origins in statistics), I sometimes find the easiest thing to do next, in order to continue manipulating the data, is to read the data back from csv, and then tell R to relabel the columns, which is what the next two lines do. If you already had your data as a csv file, then you could just start at this step, by the way.
data <- read_csv("data.csv")
data <- tibble(source = data$X1, text = data$text)
When we want to tell R to work with a particular column of data, we add the column name to the name of the table after a $ sign. So in the line above, we told R to make a new column called ‘source’ and to fill it with the information from column X1. What the hang is column X1? Because of the way we initially processed the data, the first column of data had no label. So when we loaded it back from a csv file, R gave it the label X1. (You can view any of these variables or tables by typing View(name-of-variable-you-are-interested-in) by the way. Try it: View(data))
Tidying Up Our Text
The ‘tidy’ in ‘tidyverse’ and ‘tidytext’ comes from a philosophy of working with data that says any table should have one observation per row. But we’re dealing with text, where there are lots of words that potentially we might want to count or observe. So the next few lines of code enable us to turn the text from six lines (six observations: six documents) to one observation per word in our entire corpus. This makes counting a whole lot easier.
The command below creates a new variable tidy_data where we will put our data as a table with two columns, where each word is listed in a row with the source document it came from. Again, this is the ‘tidy’ format, where one row = one observation.
tidy_data <- data %>% unnest_tokens(word, text)
The %>% is a ‘pipe’ (courtesy of the magrittr package we installed at the beginning). It passes the information in data to the unnest_tokens command, which we tell to organize by token (ie, word from our original txt files) and the source document that word comes from (text).
Now we’re going to remove stopwords, or the little words that are very common but don’t give us much macroscopic info (‘the’, ‘and’, ‘of’ etc).
The ‘data’ command loads up a list of these words, which handily enough is called ‘stop_words’:
data(stop_words)
Now we take our tidy_data, and overwrite it with a version of tidy_data that we have ‘anti_joined’ with that stopwords list - which is the same thing as saying, ‘filter out the stopwords’
tidy_data <- tidy_data %>%
  anti_join(stop_words)
(See the code at the bottom of this page for adding your own words to the stopwords list so you can filter additional words as necessary).
Now, let’s use this command to give us a glimpse (the ‘head’, or first few lines) of what our data now looks like:
head(tidy_data)
Now Let’s Count!
Now we’re going to sort out our tidy_data by turning it into a table called ‘data_words’. Each row is going to be a unique word from the entire corpus, and we’re going to sort it so the words that occur most frequently are listed first; and we’ll have a column showing which file the word appears in. Note that a word can appear in different files, so this is a count per files.
data_words <- tidy_data %>%
  count(source, word, sort = TRUE)
Knowing those counts, and knowing which files they’re in, we can now tell R to calculate tf-idf. We do this with the bind_tf_idf command. So, in the code below, we create a new variable to hold our results (called ‘data_tf_idf’); we tell R to take our data_words table above, and then calculate the tf_idf scores for each word.
The result is that we get three new colunns added to our data_words table: tf, idf, and the final tf_idf score per word.
data_tf_idf <- data_words %>% bind_tf_idf(word, source, n)
I told you tf-idf only needed one line of code!
So what can we do with that? Well, you could write that table to file so that you can open it in excel to explore, like this:
write.csv(data_tf_idf, "data_words-tf-idf.csv")
Open that csv file in Excel, then sort the columns which would give you a sense of which words are most unique to particular documents versus the rest of the corpus.
Or you could visualize the results with R. Let’s do that, shall we?
Visualize!
Scripting a visualizing - specifying precisely how R should add layers to a plot to achieve the effects we’re looking for - can be the subject for an entire course. Instead, I’m just going to walk you through one useful way of visualizing this data.
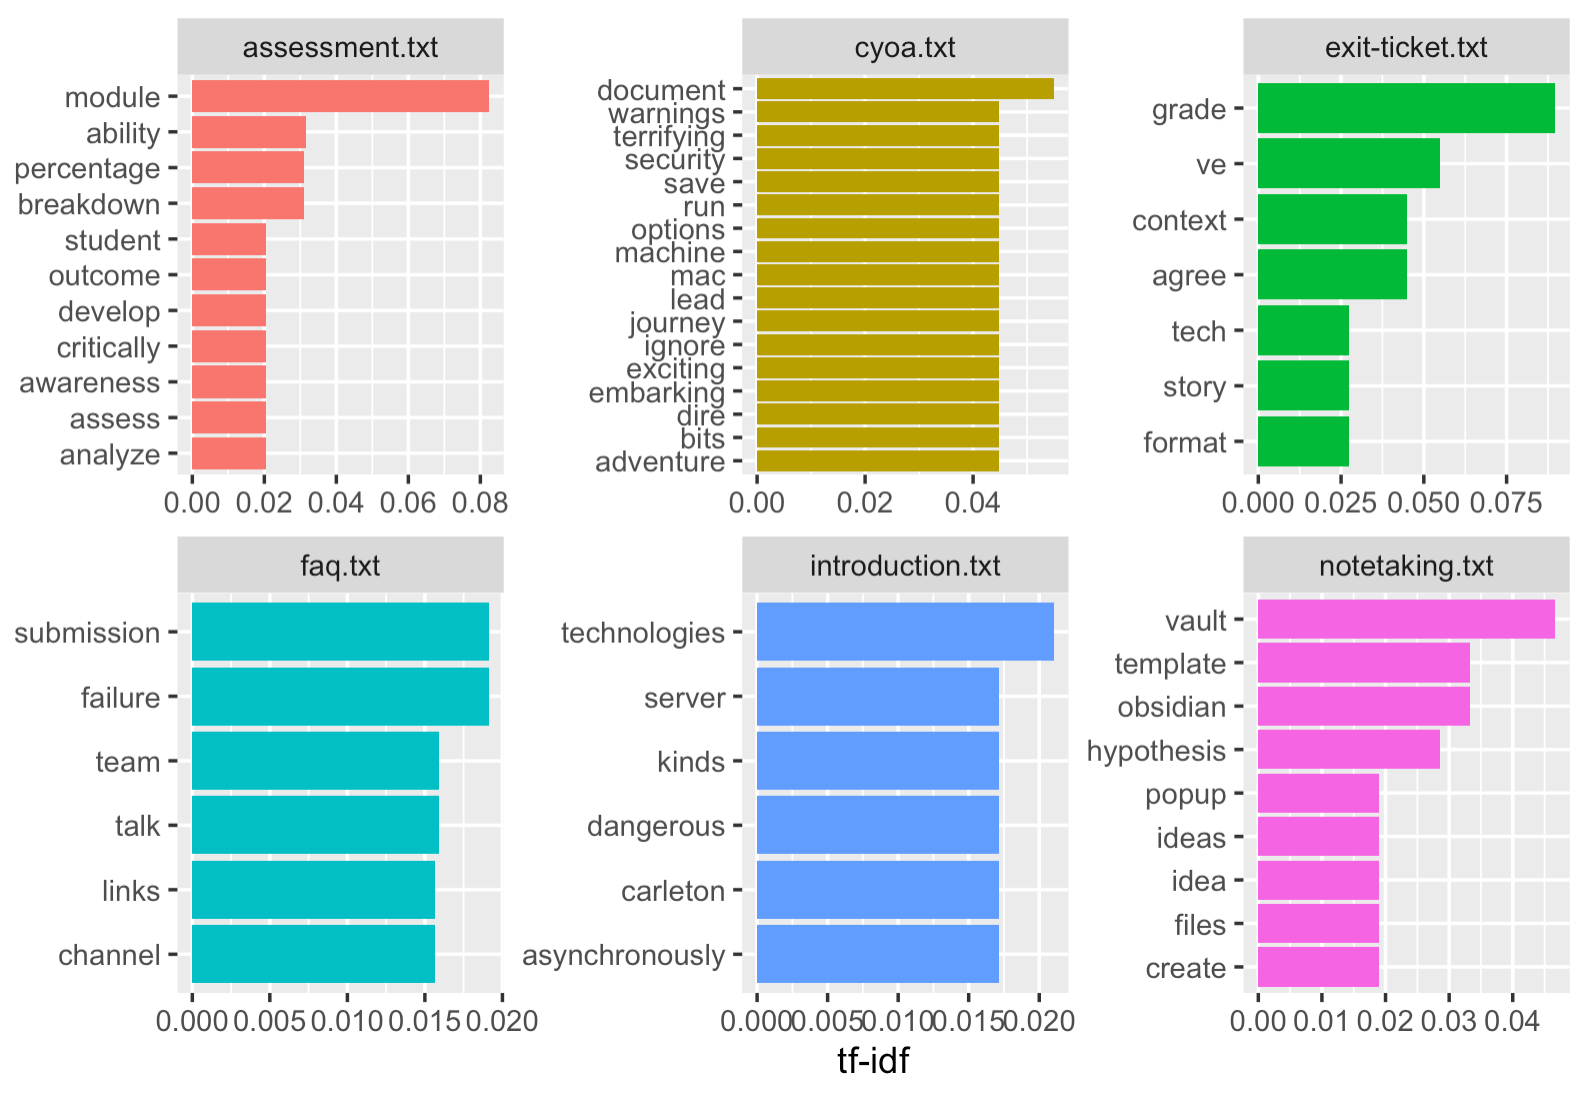
The code below takes our scores and performs a series of operations on it, and then passes the results to the final bit of code that handles the graphics. The code looks at the scores according to the source documents, and then selects the top 5 words for those documents, and then passes the result to the ‘ggplot’ graphics package. Et voilà, an interesting and insightful graph!
data_tf_idf %>%
  group_by(source) %>%
  slice_max(tf_idf, n = 5) %>%
  ggplot(aes(tf_idf, fct_reorder(word, tf_idf), fill = source)) +
  geom_col(show.legend = FALSE) +
  facet_wrap(~source, scales = "free") +
  labs(x = "tf-idf", y = NULL)
But let me walk you through the graph bit. Ggplot does a couple of things.
The first option is the aesthethics:
ggplot(aes(tf_idf) tells ggplot that it needs to plot those values.
- the next bit,
fct_reorder, is explaining to ggplot that it needs to plot the tf_idf values for the words in descending order; thefillis telling ggplot to choose a different color for each original document. - the next option,
geom_col, is where we specify whether we want a legend printed. - the next option,
facet_wraptells ggplot that we want each ‘source’ plotted as its own minigraph, rather than one big one. - the final option,
labs, are the labels to put on the x and y axes.
So there you have it: data loaded up, cleaned, processed, counted, visualized.
One last thing
You might notice in your graphs words that aren’t very helpful; ‘digital’ might be one such word, given that your source texts are from a class on digital history. You can filter this and other words out by creating a variable to hold them, and then ‘anti-joining’ them with your original data:
morestopwords <- tibble(word =
                          c("notes","note","digital"))

tidy_data <- anti_join(tidy_data, morestopwords,
                     by = "word")
…and then resuming your analysis / re-running your code from the Now Let’s Count! section onwards.